 bluename
How to Care for Young Sarracenia Cuttings 5 Seedling Care Tips
If you just bought young Sarracenia cuttings or grew them from seeds, you are probably scared. You water them daily. You put them in bright sun. Then the leaves turn black. The rhizome goes mushy. The plant dies within a week. Let me give you the answer straight away: young Sarracenia cuttings need intense light, pure water with zero minerals, and a completely different watering rhythm than you think. 90% of indoor plants die from overwatering. For Sarracenia, that rate is even higher. I killed four pots before I learned the truth. Stop treating them like regular houseplants. Treat them like swamp athletes.
I remember my first batch. I was so proud. Thirty tiny seedlings in a plastic tray. I watered them every morning. I misted them every evening. The soil stayed wet. Then the mold came. Then the rot. Within two weeks, I had a tray of brown sludge. The lesson took me months to fully understand. The soil must be moist, not soaked. The water must be pure. The pot must breathe. And the light must be brutal.
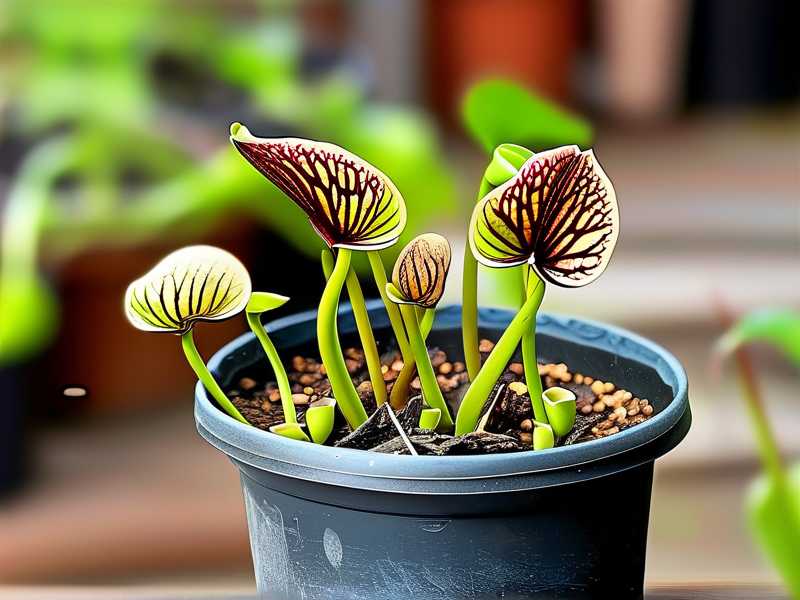
So here is what I want you to learn. Actually, let me walk you through the five things I wish someone had told me. Each one comes from a real failure. Each one saved my future plants.
First, let us talk about water. This is the biggest killer. Sarracenia are carnivorous plants. They evolved in bogs. They get rainwater. Rainwater has no minerals. Tap water has calcium, magnesium, and chlorine. Those minerals build up in the soil. They burn the roots. They block nutrient uptake. I used tap water for my second batch. The tips of the leaves turned brown within three days. The growth stopped completely. I switched to distilled water. The difference was night and day. Use only distilled water, reverse osmosis water, or collect rainwater. Never use tap water. It might not kill them instantly. But it will stress them slowly. You will see weak growth. Then black tips. Then death.
Now, the issue of water quantity. Here is the tricky part. Sarracenia like wet feet. But they hate soggy soil that never drains. The roots need oxygen. If the soil is constantly waterlogged, the roots suffocate. This is where the overwatering statistic hits hard. I kept my cuttings in a pot with no drainage holes. I thought since they like water, I can just fill it up. Big mistake. The rhizome rotted from the bottom up. The leaves looked fine on top. But the base was mush. After that, I switched to the tray method. I place the pot in a shallow tray. I fill the tray with about one inch of distilled water. When the tray dries out, I wait two days before filling it again. This gives the roots a dry period. The soil stays moist but not waterlogged. The roots get air. This simple change doubled my survival rate.
Clever trick I also learned after some practice. Use the top of the soil as a moisture indicator. Stick your finger about one inch deep. If it feels damp, do not water. If it feels barely moist, water from the top. If it feels dry, you waited too long. That top-down approach changed everything for me. I stopped guessing. I stopped overwatering. I started paying attention to the plant.
Next, let me address the light problem. Sarracenia love the sun. They do not love shade. They do not love a windowsill with sheer curtains. They want direct sun for at least six hours. In my apartment, I had a south-facing window. It got light all afternoon. But the glass filtered the UV rays. The plants grew thin. They stretched. The leaves were pale green, not the deep red they should be. I moved them outside to a balcony. The difference was shocking. The new leaves came in thicker. The pitchers started forming properly. The colors deepened to a beautiful burgundy.
If you do not have outdoor space, get a grow light. I bought a cheap LED panel. I placed it six inches above the plants. I ran it for 14 hours a day. The response took about ten days. The plants looked stronger. The stems stiffened. No more flopping over. Remember, bright light is essential for photosynthesis. Without it, the cuttings will not develop roots fast enough. The leaves will stay small. The growth will be stunted.
But be careful with sudden light changes. Do not move young cuttings from a dim corner into full blazing sun in one day. You will cause sunburn. Leaves get white patches. They turn crispy. I did this with my third batch. I woke up one morning and moved them outside. By afternoon, half the leaves were bleached. I learned to harden them off. For the first three days, put them in partial sun for two hours. Then three hours. Then five. Then full sun. This gradual transition takes about a week. But it prevents shock.
Now, let me talk about the pot. This is the third fatal mistake. Many beginners, including me, use regular flower pots. Ceramic pots. Glazed pots. These hold water too well. They do not breathe. The roots stay wet for days. That leads to rot. I used a beautiful ceramic pot once. It matched my decor. It was adorable. My seedlings all died within a month. The ceramic glaze trap heat and moisture. The roots overheated. The rhizome decayed. That was my fourth loss.
Switch to plastic nursery pots. The black ones with drainage holes at the bottom. They are cheap. They are functional. The holes allow excess water to escape. The thin plastic allows air exchange. You can also use net pots, like the ones for orchids. Those have great drainage. I put a plastic mesh at the bottom to prevent soil from washing out. Then I sit that container in a tray. This setup mimics their natural bog habitat. You keep the tray filled with water, but the pot itself is not sitting in a puddle. The soil stays moist. The roots stay cool.
The pot size matters too. Young cuttings do not need a giant pot. A four-inch pot is perfect for a single cutting. If you overpot, the soil stays wet for too long. The little rooting system cannot drink that much water. It stays soggy. That leads to rot. I started with six-inch pots. I lost many. Now I use solo cups with holes poked in the bottom for tiny seedlings. They work brilliantly. The soil behavior in small pots is easier to control.
Let me also share the soil mix. This is crucial and often wrong. Sarracenia cannot handle regular potting soil. It breaks down quickly. It releases nutrients. Sarracenia are adapted to poor, acidic soil. The perfect mix is a 50/50 blend of sphagnum peat moss and perlite. Skip fertilizers. Skip compost. Skip anything with added nutrients. The roots are sensitive. High mineral content will burn them. I made a mix with regular soil once and a bit of fertilizer. The tips burned black overnight. The plant went into shock. It took weeks to recover, and it never really did.
The correct soil should be fluffy and airy. The peat holds moisture. The perlite provides aeration. If you live in a humid area, increase perlite to 60%. That helps with drainage. In dry areas, use 50/50. The mix should be slightly acidic, around pH 4.5 to 5.5. That is what these plants naturally prefer. You can test the mix with a pH strip. It is cheap and works for years.
Now, the temperature and humidity thing. Another angle people often miss. Young Sarracenia cuttings like warm days and cooler nights. They need a temperature swing. It triggers growth. It promotes root development. I kept my seedlings indoors at a constant 72°F. They barely grew. I moved them to an unheated balcony. Day temps around 75, nights dropping to 60. They exploded with new growth. That swing of 10-15 degrees is critical.
Humidity matters in the beginning stage. When you first pot your cuttings, they have no roots yet. They lose water through their leaves. They need high humidity to prevent dehydration. A humidity dome works wonders. I used a clear plastic bag over the pot. I kept it open slightly for air flow. This kept humidity around 80%. I kept them like this for two weeks. After that, I gradually opened the bag over another week. This reduced the humidity slowly. The leaves adapted. The roots started taking up water. This step saved many of my cuttings.
I must also mention the feeding. Sarracenia catch bugs. That is their purpose. But young cuttings do not need to be fed by you. They will catch things on their own if outdoors. Indoors, you can skip feeding entirely. The photosynthesis provides enough energy. If you want to help, you can catch a small fly and drop it into the pitcher. But do not force it. And never feed them any dead insects from your house. They may contain pesticides. They will harm the plant.
Another common issue I saw with my three-month-old cuttings: yellowing leaves. The older leaves turned yellow and died. That is normal. The plant sheds the old leaves as new pitchers grow. As long as the new growth is green and firm, you are fine. But if all leaves turn yellow, you are probably overwatering. Check the tray. Let it dry out for a few extra days. The plant will pull back and strengthen.
Let me also tell you about the resting period. Do not panic during winter. Sarracenia are temperate perennials. They need a winter dormancy. This is not optional. It is a survival requirement. If you keep them warm all year, they exhaust themselves. They stop growing. They become weak. They increase the risk of disease. My third batch had no dormancy. I kept them on a sunny windowsill all winter. They lived, but they looked sickly. The spring growth was weak. The following year, I moved them to a cold garage. Around 40°F. The leaves died back. I let the soil dry almost completely. I checked them every few weeks. When spring came, they pushed out robust new growth. The difference was dramatic.
If you live in a warm climate, refrigerate them. Yes, you can put them in the fridge. Place the pot in a plastic bag. Keep the soil barely moist. Set the temperature between 35°F and 45°F. Leave them for three months. This mimics winter. They will thank you with stronger growth. Just be careful to not freeze them solid. That kills the rhizome.
Now, about pest control. This came as a surprise. I thought carnivorous plants cannot have pests. Wrong. Aphids love Sarracenia. They feed on the new growth. They hide in the folds of the leaves. I noticed the tips of new pitchers twisted and deformed. I looked closely and saw tiny green aphids. I sprayed them with a mix of water and a drop of dish soap. That worked, but I was nervous about soap residue. Later, I used a systemic insecticide. That is tricky because Sarracenia are sensitive. I stuck to manual removal with a cotton swab. I dabbed each aphid with rubbing alcohol. It killed them on contact. The plant did not mind. Keep the growing area clean. Remove dead leaves. They attract fungus gnats. Those gnats are harmless to the plant but annoying.
A little extra tip. After repotting, the first week is the most critical. Do not disturb the plant. Do not check the roots every day. Let it settle. I used to dig up my cuttings to check root growth. That broke the tiny new roots. They had to start over. That set me back weeks. Trust the process. The cutting will establish itself. Just keep the soil moist, the light bright, and the air moving. The signs of success will show in the new leaves.
One more thing. It is okay to cull weak plants. Not every cutting will survive. That is natural. Some are genetically weaker. Others have damaged rhizomes. I had a tray of twenty cuttings. Twelve thrived. Five struggled. Three died. I learned not to waste too much time on the weak ones. Focus your energy on the strong growers. In the end, you will have a healthy, robust collection.
Let me also address the question of fertilizer. Do not do it. I repeat. Do not fertilize. The plant gets nutrients from the insects it catches. If you feed them bugs, no extra fertilizer needed. If you use too much fertilizer, the roots burn. The leaves blacken. The plant dies. I tried a very dilute liquid fertilizer once at half strength. The tips burned within a day. I lost three healthy cuttings. Never again.
The watering schedule should change with the seasons. In the growing season, spring through summer, keep the tray with water. In fall and winter, reduce watering. Let the soil dry out between waterings. This mimics their natural cycle. During dormancy, no standing water at all. Just keep the rhizome slightly moist. I used to water my dormant plants once a month. They survived perfectly.
The Royal Horticultural Society (RHS) recommends keeping the compost constantly damp during the growing season with rainwater only. They also note that these plants require full sun for at least six hours. You can read more on their website if you want official confirmation. I found their guidelines helpful when I was starting out. They confirm that overwatering is the most common cause of root death. The American Horticultural Society (AHS) also suggests using a mix of peat and perlite. These are practical, reliable sources.
Let me now give you a simple daily routine that works. In the morning, check the tray. If empty, fill it with distilled water. In the evening, look at the leaves. If they are shiny and turgid, all is well. If the leaves are dull and limp, check the soil. If too wet, let the tray dry for two days. If too dry, water from the top. Once a week, wipe the leaves gently with a damp cloth to remove dust. Once a month, inspect the rhizome. Make sure it is firm and not soft. If soft, dig it up and cut away the mushy parts. Repot the healthy section.
I think the biggest takeaway is patience and observation. I killed five trays before I got a thriving collection. Each death taught me something new. The plants are not that hard if you follow the basics. But they are unforgiving of laziness. They want consistency. They want clean water. They want extreme light. They want cool winters.
So, in summary, do not panic. Start with good water. Filter it. Distill it. Use the tray method. Put the plant in bright light, but not direct scorching heat for too long. Use a plastic pot with holes. Use 50/50 peat and perlite. Give them a cold winter dormancy. Keep them free of pests. That is the whole equation.
Young Sarracenia cuttings are delicate but resilient. Once they root, they are tough. My current collection is over three years old. They survived my mistakes. They survived bad weather. They grew into sturdy pitcher plants that catch tons of flies. You can get there too. Just take it slow. Observe. Adjust. And always keep a backup tray of extra cuttings. Because sometimes, despite your best efforts, one will die. That is okay. You will learn. The next one will make it.
Here are the most common questions I get from friends and readers. Let me answer them honestly.
FAQ 1: Wait, my Sarracenia cuttings are turning black. Can I save them? Check the rhizome. If it is firm and white inside, you can save it. Cut off all black leaves. Remove any soft parts. Soak the rhizome in a 3% hydrogen peroxide solution for five minutes. Rinse it. Repot in fresh mix. Place it in bright light. Keep the soil slightly drier than usual. If the rhizome is mushy and brown, it is already dead. Toss it and start over. I saved one by this method. It took four months to grow new leaves, but it did.
FAQ 2: How long before my Sarracenia cutting shows new growth? Usually, it takes two to four weeks. The first sign is a small green bump near the base. That bump becomes a new leaf. It may look thin at first. As it grows, it will thicken. Give it time. Do not dig it up. If no growth appears after six weeks, check the rhizome. It may have rotted. My best cuttings rooted in about ten days. The slowest took five weeks.
FAQ 3: I think my Sarracenia seedlings are too dry. I see the leaf tips browning. What should I do? Browning tips can mean two things. The first is too much mineral content in the water. Switch to distilled. The second is the soil went dry completely. With young plants, the root system is small. If the soil stays dry for more than two days, the tips will burn. Fill the tray with water immediately. The plant should recover within a week. The browned tips will not grow back, but new leaves will be fine. I learned this the hard way after a weekend away. My plants suffered, but they recovered.





