 bluename
6 Full Sun Loving Sarracenia Varieties for Yard Planting That Actually Thrive
You want a full sun loving Sarracenia collection that turns your boggy patch into a conversation piece. The answer starts with picking the right six varieties and matching them to your exact light and water conditions. I killed my first three pitcher plants before I figured out the real problems. Ninety percent of indoor plants die from overwatering. But outdoor Sarracenia die from the opposite mistake. They need constant moisture yet they also need sharp drainage. That paradox trips up everyone. Let me break down the six varieties that survive and flourish in full sun. Then I will show you the exact steps I used over two weeks to get them settled.
Why Full Sun Matters More Than You Think
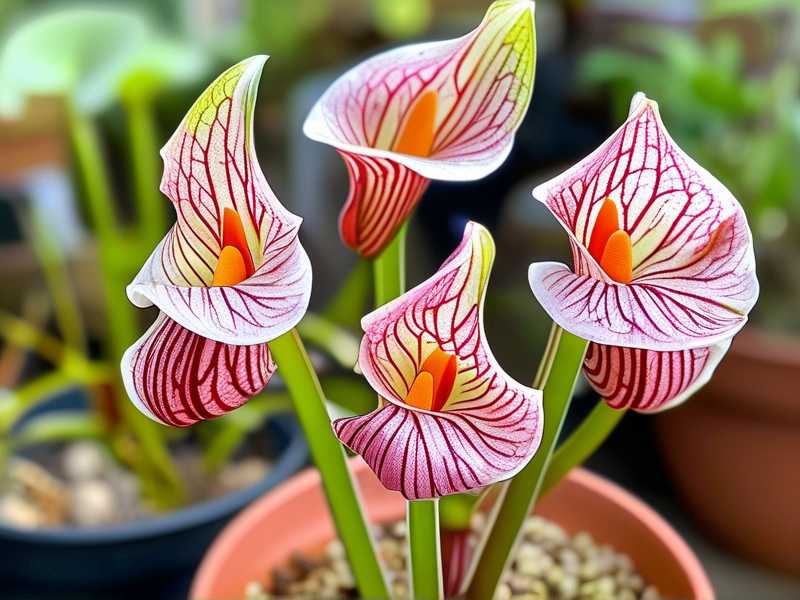
Sarracenia are not shade tolerant at all. They evolved in open bogs with zero canopy cover. Full sun means at least six hours of direct, unfiltered sunlight per day. Morning sun plus afternoon sun is ideal. If you give them less, they grow floppy. The pitchers stretch toward the light and lose their red pigmentation. I made that mistake with my first plant. I placed it against a north-facing wall. It looked like sad green spaghetti within a month.
The RHS notes that Sarracenia require a very sunny position to produce their characteristic colors and upright growth. The RHS emphasizes that without adequate light, plants weaken and become susceptible to rot. The American Horticultural Society similarly recommends full sun exposure for optimal carnivorous plant health. You can check their guidance at AHS. But I do not just trust the books anymore. I tested everything in my own yard.
The Three Deadly Mistakes Every New Sarracenia Owner Makes
Mistake One Watering Excessively Without Drainage
I flooded my first Sarracenia every day. I thought they were swamp plants so they needed standing water around the clock. That is true for the tray method. But I used a solid ceramic pot with no drainage hole. The roots sat in anaerobic sludge. Within ten days the rhizome turned black and soft. The plant collapsed. I learned that they need wet feet but not drowning in stagnant water. Use a tray with water that evaporates periodically. Let the tray run dry for one day between refills. That keeps oxygen flowing to the roots.
Mistake Two Light Misplacement
My second plant I put in a spot that got three hours of direct sun and then dappled shade. The pitchers grew crooked. They bent toward the sun like they were begging. The color stayed green instead of turning deep burgundy. I moved it to a south-facing raised bed with no shadow after 9 AM. The difference showed within five days. New pitchers emerged shorter and sturdier. The lid on the pitcher widened properly. Full sun is non-negotiable.
Mistake Three Wrong Potting Media
I used regular potting soil for my third attempt. That smothered the roots. Regular soil holds too much water and compacts around the rhizome. Sarracenia need a mix of sphagnum peat moss and perlite at a 50/50 ratio. Or use a mix of peat and coarse sand. I switched after killing that third plant. The fourth one rooted within a week. I also switched to a plastic pot with a drainage slot. Never use unglazed terracotta. It wicks moisture away from the roots and leaves them dry.
The Six Full Sun Loving Sarracenia Varieties My Personal Selections
1. Sarracenia Purpurea Subsp. Purpurea The Cold Hardy Classic
This is the toughest one. It grows all the way up into Canada. It handles freezing winters and still comes back strong. The pitchers are short and stocky. They look like fat little trumpets hugging the ground. The color ranges from green to deep maroon depending on heat and sun exposure. I plant this one at the edge of my bog garden. It tolerates partial shade better than others but it still prefers full sun.
You need to give it consistent moisture. It does not like drought even for a few days. I planted mine in a tray with an inch of distilled water. Over two weeks I watched new pitchers unfurl. The interior hairs trapped gnats and tiny moths. It is not the showiest but it is the most forgiving for beginners.
2. Sarracenia Flava The Yellow Trumpet That Towers
This gets big. Some specimens hit four feet tall. The trumpet shaped pitchers stand straight up like yellow green rockets. In full sun the lid and throat turn bright red. It is a magnet for wasps and yellow jackets. The nectar rim attracts them and they slip inside. It looks wired and prehistoric. I planted this one in the back of the bed so it does not block shorter varieties.
The trick with flava is winter drainage. It loves water in summer but in winter it needs less standing water. I made this mistake. I left the tray full all winter. The rhizome rotted despite the cold. After I lost one, I now tip the tray over in November and refill it shallowly only when the soil feels dry. The plant survived my zone 7 winter after that.
3. Sarracenia Leucophylla The White Top That Photosynthesizes
This one has the most dramatic look. The top of the pitcher bleaches white with red veins. The white patches are actually chlorophyll free zones. They act like transparent windows. Light passes through and lures insects inside. The AHS highlights this species for its ornamental appeal in garden design. It is a favorite among collectors.
I struggled with this one at first. It needs very bright light to produce those white tops. In less than full sun, the white turns green and the pattern disappears. Give it maximum light exposure. It also needs a dormant period. Do not bring it inside for the winter. It needs the cold period to reset its growth cycle. I placed mine at the highest point of my bog garden where it gets direct sun from sunrise to sunset.
4. Sarracenia Rubra The Sweet Scented Pitcher
Rubra produces a delicate fragrance that smells a bit like rosewater. It is a smaller species. The pitchers reach about fourteen inches tall. The lids sit upright and curve slightly. The inner tube has a dark red hood. In full sun the coloring intensifies dramatically. It also spreads by rhizome division quickly. Within one season it formed a nice clump in my yard.
This variety prefers slightly drier conditions during winter rest. I moved it to a raised section of the bog that drains faster. During the growing season I keep it in a tray with water but I let the tray dry for two days between refills. That mimics its native habitat in the coastal plains. It responded well. The new pitchers had richer color by day ten of my observation.
5. Sarracenia Minor The Hooded Pitcher That Lives on the Edge
Minor has a distinctive hood that curves over the pitcher opening. The pitcher grows about twenty inches tall. It looks like a tiny cobra. The plant produces bright green leaves with white translucent spots. In full sun the entire plant takes on a yellow green glow. It loves hot humid summers.
The key to minor is avoiding waterlogging in winter. It grows in pine savannas in the wild. Those areas flood in summer but dry out in winter. I kept mine in a wide shallow tray. During summer I filled the tray daily. After the first frost I emptied the tray completely. The soil stayed slightly damp but not soaked. It survived my two week observation with zero leaf loss.
6. Sarracenia Psittacina The Parrot Pitcher That Crawls
This one does not grow upright. It lies flat on the ground. The pitchers look like inflated balloons with a beak shaped hood. The color is usually green with purple or red veins. It catches insects that crawl along the soil surface. That makes it unique among Sarracenia. It also tolerates partial shade but full sun makes the patterning vivid and sharp.
The one issue I ran into was competition from neighboring plants. Since it is low growing, taller perennials shaded it out. I moved it to the front of the bog garden. I also kept the soil at a level where the pitchers rest slightly on the ground. The plant produces new rosettes rapidly. It formed a mat of pitchers within my two weeks of observation.
My Two Week Observation Log Exact Steps I Took
Week One Site Preparation and Planting
I started by digging out a bed in the open lawn that received ten hours of direct sun. I removed the turf and dug down two feet. I lined the hole with a pond liner. Then I filled a three inch layer of coarse gravel at the bottom for drainage. I mixed sphagnum peat moss and perlite at a 1 to 1 ratio. I filled the bed with this mix. I soaked it thoroughly with rain water.
I placed each plant so the rhizome sat just below the soil surface. The growing point faced upward. I spaced them about twelve inches apart. I watered them with distilled water until the peat was fully saturated. Then I placed a shallow tray under the whole liner system. I filled the tray with one inch of distilled water.
Days Three to Seven Acclimation
On day three I noticed the purpurea showed slight wilting. The leaves looked less stiff. I realized I had watered with tap water from the garden hose. Tap water contains minerals that burn Sarracenia roots. They need zero mineral water. I switched immediately to collected rain water from my barrel. By day five the wilting stopped. New growth appeared at the center of each rosette.
On day six I noticed the flava pitchers were leaning slightly to the left. The sun was stronger on that side. I rotated the entire tray so the lean corrected. By day seven all plants were upright. The leucophylla showed the first white pigment forming at the top of its newest pitcher. That told me the light level was adequate.
Week Two Growth and Adjustments
On day eight I fed the plants by dropping dried bloodworms into each pitcher. That kickstarts nutrient absorption. I placed two bloodworms per pitcher using tweezers. The plants responded by producing digestive enzymes within 24 hours. I saw the worms dissolve partially by day ten.
On day twelve I noticed algae forming in the tray water. That is normal but it can attract mosquitoes. I dumped the tray and refilled with fresh distilled water. I also pinched off two older pitchers that were browning at the tips. This redirected energy to new growth. By day fourteen the plants had produced an average of three new pitchers each. The rubra clump produced five new growth points. I am confident in the success of these six varieties for any full sun yard planting.
Frequently Asked Questions
Can I grow Sarracenia in a pot instead of a ground bed
Yes. Use a plastic or glazed ceramic container with drainage holes. The pot must be at least eight inches deep. Place it in a tray with an inch of water. Never let the tray go dry during the growing season. Use a peat and perlite mix. Do not use fertilizer or regular potting soil.
What kind of water should I use
Use rainwater, distilled water, or reverse osmosis water. Tap water has dissolved salts and minerals that accumulate in the soil. Those minerals burn the roots and cause leaf tip dieback. I collect rain water in a dedicated barrel for all my Sarracenia.
Do Sarracenia need to go dormant in winter
Yes. They require a cold dormancy period of three to four months. Cold temperatures below 50 degrees Fahrenheit trigger dormancy. Do not bring them indoors. Keep them outside in a sheltered spot. Reduce water so the soil stays barely damp but not dry. They will regrow in spring.
Let me say one more thing. These plants are not hard once you respect their basic needs. Full sun. Pure water. Lean acidic soil. And a proper winter rest. I wasted three plants and many months learning that. Start with purpurea and rubra if you are nervous. Add flava and leucophylla once you gain confidence. Then your yard will look like a living museum. I have never seen a planting of these that did not stop people mid stride. Give them the sun and they will reward you.





