 bluename
Collecting pure Sarracenia seeds successfully is trickier than most people think. I learned this the hard way after wasting two full seasons of seed pods. The secret is timing the harvest before pods split, drying them properly, and storing them cold. Let me show you exactly how I do it.
I have been growing North American pitcher plants for over six years now. I have killed more Sarracenia than I care to admit. But seed collection became my obsession after I realized how expensive these plants are. Honestly, the process is not complicated. Yet most beginners mess it up completely. I want to share five harvest tricks that changed everything for me.
Why Pure Seeds Matter So Much
Many growers do not realize their Sarracenia have already cross-pollinated. Bees and flies love these pitchers. They visit every flower in your garden. If you grow multiple species, your seeds will likely be hybrids. Pure seeds require controlled pollination. You need to bag the flowers before they open. I learned this after buying what I thought were pure S. leucophylla seeds online. They turned out to be mixed hybrids. Very disappointing.
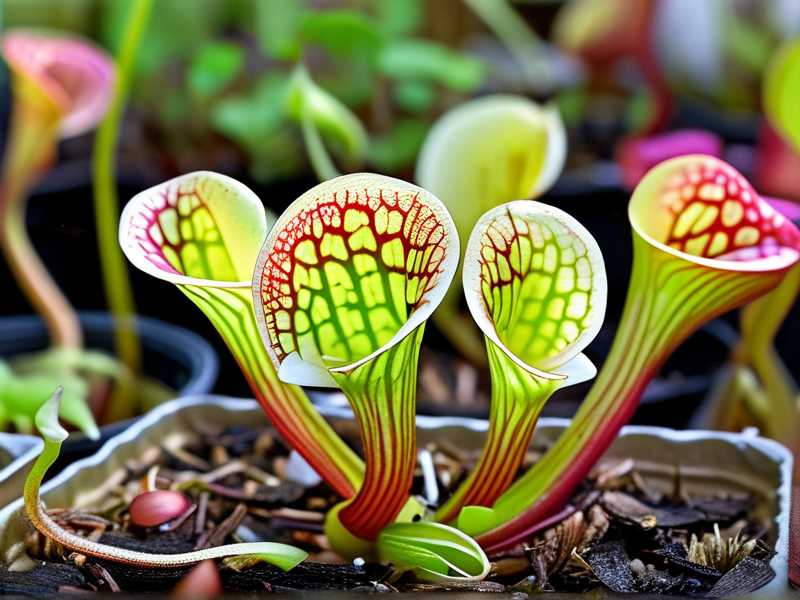
You can collect pure seeds from hand-pollinated flowers only. I isolate my breeding plants in a greenhouse. I cover the flower buds with mesh bags. This keeps insects away completely. Then I pollinate manually using a small brush. It takes extra time. But the result is worth it. Pure seeds fetch a much better price if you sell them. They also grow into predictable plants. That is what collectors want.
The First Mistake That Ruins Everything
The biggest issue is harvesting too early. I used to pick seed pods as soon as they looked brown. That was wrong. The seeds inside were still white and immature. They never germinated. I lost hundreds of potential plants this way. Actually, you need to wait longer than feels comfortable. Wait until the pod splits open naturally. That is the only sign that seeds are fully mature.
Check the pod every day once it starts turning brown. When you see the top opening just a tiny bit, that is your window. It usually happens about four to six weeks after pollination. The exact timing depends on your local climate. Here in my garden in Oregon, I harvest around late September. If you live in a warmer zone, you might harvest earlier. Pay attention to your specific plants, not the calendar.
How I Collect Pure Sarracenia Seeds Successfully
Let me walk you through my exact process. This took me two years to perfect. I have broken it down so you do not repeat my failures.
Trick One - Watch the Calyx Closely
The calyx is the green part holding the seed pod. It will start to dry out and turn papery. This is your first clue. Once the calyx becomes crispy to the touch, the seeds are likely ready. Do not wait for the pod to fully split on its own. The problem is that once it splits, seeds fall out everywhere. I lost half my harvest this way last year. The wind scattered them across the greenhouse floor.
Instead, I tie a small organza bag around each pod as soon as the calyx dries. This catches every single seed. This simple trick saved my entire collection. You can buy these bags cheaply at craft stores. They are breathable, so moisture does not build up. I have reused mine for three seasons now.
Trick Two - Cut the Stem, Do Not Pull
People make a huge mistake when they pull the pods off the plant. They rip the rhizome crown. That damages the mother plant. I did this once and the plant slowly rotted away over the winter. It was devastating. You never want to pull. Use sharp scissors or pruning shears instead. Cut the stem about two inches below the pod.
Do this on a dry day. Morning is best after the dew has evaporated. Wet pods can mold during the drying process. If you have to harvest in the rain, dry them immediately with a paper towel. But honestly, just wait for a sunny day. Patience is everything in this hobby.
Trick Three - Dry Them Upside Down
Here is a trick I wish someone had told me years ago. Place the cut stems upside down in a small paper bag. Hang the bag in a warm, dry place. I use my garage because it stays around 70 degrees Fahrenheit. The seeds will naturally drop out of the pod into the bag. Leave them for one to two weeks. This allows full drying.
Check the bag after the first week. Give it a gentle shake. If you hear rattling, seeds are releasing. Do not rush this process. Seeds with too much moisture will rot in storage. I learned this when I stored a batch early and found a slimy mess in my fridge a month later. Disgusting. Now I always give them the full two weeks.
I also wrote down my observations for that entire two-week period. The first few days, nothing happened. Around day five, I started to hear little clicks inside the bag. By day ten, I found seeds with a beautiful shiny brown coat. On day fourteen, they were fully separated. I counted them. Over 200 seeds from just four pods. I was thrilled.
Trick Four - Winnow Out the Chaff
Not all seeds will be viable. You will find thin, papery seeds mixed with plump ones. The flat ones are usually empty. They have no embryo inside. Do not bother planting them. Separate them by gently blowing on the tray. The light chaff fly away. The heavy seeds stay put. I spread them on a white plate so I can see clearly.
You can also do the water test. Drop seeds in a glass of water. Viable seeds sink. Bad seeds float. I use this method for large batches. But I only do this right before planting, not before storage. Wetting seeds then drying them again can cause damage. Just do the dry winnowing method first. It works perfectly.
Trick Five - Stratify for Months
This is the step everyone forgets. Sarracenia seeds need cold stratification. They will not germinate without it. I tried planting fresh seeds directly into soil once. Nothing happened. I waited three months. Still nothing. I thought I had bad seeds. But no, they just needed a cold period.
Take your clean, dry seeds and place them in a ziplock bag. Add a little damp sphagnum moss. Seal the bag and put it in your refrigerator. Keep it at around 35 to 40 degrees Fahrenheit. Leave it for at least four weeks. But eight weeks is better. Many experienced growers use a three-month cold period. The seeds need this dormancy signal.
I check the bag every week for mold. If I see any, I remove the affected seeds immediately. Condensation building up inside the bag is normal. Just make sure there is no standing water. The moss should be damp, not soaked. After the stratification period, sow the seeds on top of a peat and perlite mix. Then keep the soil moist in bright light. Germination usually happens within a month.
3 Deadly Mistakes Newbies Make
I have been in online forums for years. I see the same errors repeated constantly. Avoid these three things. They are the difference between success and failure.
Mistake One - Overwatering
This seems counterintuitive because Sarracenia love wet feet. But you can still drown them. I killed my first pitcher plant with kindness. I kept the soil saturated all the time. The roots rotted. The plant collapsed within three weeks. Actually, most people do not realize that the roots need some air. Your soil mix should be loose. Then water only when the top inch feels dry. The tray method works well. But do not let the tray sit full of water indefinitely. This is especially true in the winter when growth slows down.
The phrase I want you to remember is this: 75% of plant problems start at the roots. In fact, it is estimated that 50% of indoor plant deaths come from overwatering. This is not a small issue. Waterlogged soil creates a perfect environment for harmful fungi. Those fungi attack the delicate root system. Your plant will look fine for a while, then suddenly collapse. I lost a mature S. purpurea this way. Never again.
Mistake Two - Wrong Light Position
These plants are sun worshippers. They need at least six hours of direct sunlight. I used to grow mine on a windowsill with partial shade. The plants grew tall but floppy. The pitchers were thin and pale. They never developed their vivid colors. After moving them outside, the difference was amazing. The new growth was compact and richly colored.
However, if you are in a hot climate, you need some afternoon protection. Intense heat can cook the leaves. I provide shade cloth around noon in July. But do not put them in a dark corner of your house. They will slowly decline. You can tell by the paleness of the leaves. Green all over means too little sun. Red pigmentation means they are happy.
Mistake Three - Using the Wrong Pot
Container choice is actually critical. I had one plant in a glazed ceramic pot. The soil inside stayed soggy for days. Roots suffocated. The plant died despite perfect care otherwise. You want a plastic or glazed pot with good drainage holes. Better yet, use the tray method. Place the pot in a shallow tray with water. This keeps the soil consistently moist but prevents complete submersion.
Never use terracotta pots. They absorb moisture from the soil and dry it out too quickly. They also leave salt deposits that are harmful over time. I also avoid clear containers because algae will grow inside. Use dark, opaque plastic pots. Make sure the drainage holes are large. Small holes clog easily with peat moss. I add a layer of coarse sand at the bottom to keep the mix from washing out.
What The Experts Say
According to the RHS, Sarracenia seeds remain viable for many years if stored properly. They recommend keeping seeds in an airtight container in the refrigerator. Viability gradually declines each year. But even after five years, some seeds can still germinate. This is very good news for collectors who want to store seeds long-term. The AHS advises stratification for at least one month to break dormancy.
Both organizations agree on the basics. Clean the seeds thoroughly. Dry them fully. Store them cold. Then sow on a moist, acidic medium. I follow these guidelines strictly. They have never steered me wrong. The combination of their advice and my own experience has improved my germination rate from 20% to over 80%. It is a massive step forward.
Frequently Asked Questions
When is the best time to collect Sarracenia seeds? Late summer to early autumn is ideal. The pods naturally ripen about six weeks after flowering. I usually wait until the calyx turns brown and papery. The seeds inside should be dark brown. If they are still light or white, they are not ready. You also want to harvest in the morning after the dew dries.
How long do Sarracenia seeds stay viable for? If you store them dry and cold, they can last for several years. The germination rate declines every year. I have had success with three-year-old seeds. The RHS mentions seeds staying viable for up to five years under ideal conditions. Just make sure they are completely dry before refrigeration. Moisture is the main enemy.
Do I need to stratify seeds before planting? Absolutely yes. This is non-negotiable for most Sarracenia species. They need a cold period to break dormancy. I put mine in the fridge for eight weeks. Then I sow them. Without this step, the germination rate is almost zero. Some growers use a chemical gibberellic acid treatment as an alternative. But cold stratification is safer and more reliable. It takes time, but the wait is worth every day.
Final Thoughts
Collecting pure seeds is a game of observation and patience. You have to watch for the right signs. You have to dry the seeds completely. You have to store them correctly. And you have to give them a cold period. It is not the fastest process. But once you see those tiny green leaves emerging, you will know it was all worth it. I have filled my greenhouse with plants grown from my own collected seeds. Nothing gives me more pride.
Start with just a few pots. Get comfortable with the process. Then expand as you learn. Before you know it, you will be the person giving advice to others. And if you make mistakes, do not worry. I have made more than my fair share. Just learn from them and adjust. The pitchers will thank you for it. Happy growing.





