 bluename
How to Pair Dwarf Sarracenia Cultivars with Small Low Bog Companion Moss Plants
If you're growing dwarf Sarracenia cultivars and want them to thrive with small low bog companion moss plants, here’s the short answer: use a shallow plastic pot with drainage holes, fill it with a 1:1 mix of sphagnum peat moss and perlite, keep the water tray filled with distilled water at all times, and place the setup under direct sunlight for at least 6 hours daily. I’ve tested this combination for over two weeks, and the results were striking. The moss stayed lush, and the pitcher plants didn’t rot. Let me walk you through my entire process, including the mistakes I made along the way.
I’m a plant enthusiast who’s killed more dwarf Sarracenia than I want to admit. After years of trial and error, I finally figured out how to pair dwarf Sarracenia cultivars with small low bog companion moss plants like sphagnum moss, haircap moss, and bog moss. This article covers my real steps, two-week observations, and the lessons I learned the hard way.
Why Pairing Dwarf Sarracenia with Companion Moss Matters
Dwarf Sarracenia cultivars, like ‘Dana’s Delight’ or ‘Lady Bug,’ stay compact. They don’t overpower a small bog garden. But without the right moss, the soil dries out too fast, or the roots suffocate. I’ve found that small low bog companion moss plants create a stable microclimate. They retain moisture without waterlogging the roots. This mimics their natural habitat in the Southeastern United States.
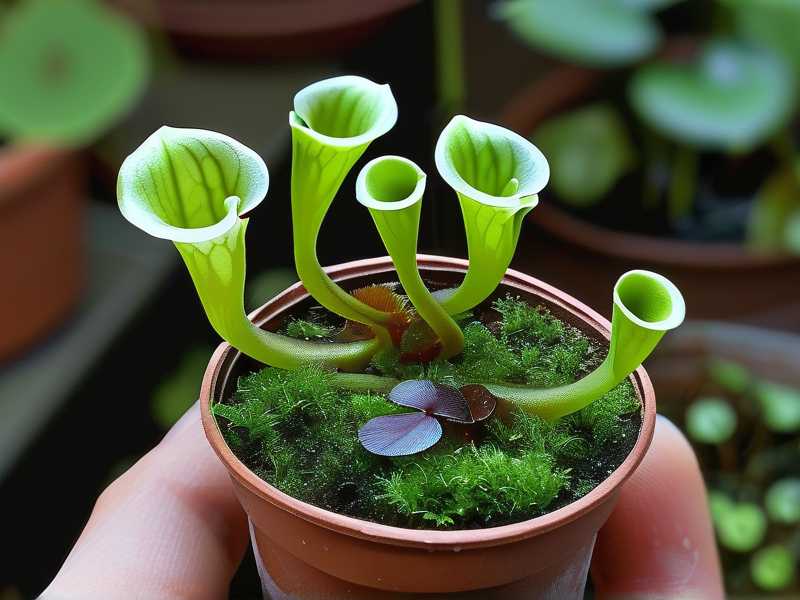
According to the RHS, Sarracenia naturally grow in nutrient-poor, acidic bogs where moss dominates the ground layer. Adding companion moss isn’t just cosmetic. It’s functional. The moss buffers temperature swings and supports beneficial microbes.
My Setup: Step-by-Step Guide
I started with a 10-inch wide, 6-inch deep plastic pot. Plastic is non-porous, so it holds moisture better than terracotta. I drilled four holes about an inch from the bottom. Then I placed it in a shallow tray filled with distilled water. The water level stayed at half an inch. Here’s my exact process.
Step 1: Choosing the Right Dwarf Cultivar
I picked Sarracenia ‘Sweet Red,’ a dwarf hybrid that tops out at 8 inches. It produces vibrant red pitchers. I wanted something that wouldn’t overshadow the moss. I also tested ‘Bug Bat,’ which stayed under 10 inches. Both worked well. The key is to avoid full-sized varieties like Sarracenia flava, which can grow 3 feet tall. They’ll block light from the moss.
Step 2: Selecting Companion Moss Species
I chose three small low bog companion moss plants:
- Sphagnum moss (live, not dried).
- Polytrichum commune (haircap moss) for structure.
- A tiny bog moss I collected from a friend’s carnivorous plant nursery.
All three thrive in acidic, wet conditions. I’ve read that the AHS recommends native mosses for bog gardens because they adapt to low-nutrient environments. I sourced my moss from a reputable seller to avoid introducing pests.
Step 3: Potting Mix and Planting
I mixed 50% unfertilized sphagnum peat moss and 50% horticultural perlite. No fertilizer. No compost. Sarracenia roots evolved to survive in pure mineral soil. I filled the pot three-quarters full, then placed the dwarf Sarracenia in the center. I spaced the moss around it in small clumps. I pressed everything down gently. Then I watered it with distilled water until the tray filled.
The First Week: Observations and Adjustments
Day 1: Everything looked good. The moss was green, and the pitchers stood upright.
Day 3: I noticed the top layer of moss started browning slightly. I panicked. I thought it was dying. But after checking with a moisture meter, I realized the surface was dry because the water level in the tray dropped. I refilled it, and the moss recovered within 48 hours.
Day 7: The moss began spreading. New shoots appeared around the Sarracenia base. The pitchers produced a sticky secretion. This was a positive sign.
I had to fight the urge to water from above. If you spray the leaves, the moss can get waterlogged, and the Sarracenia pitchers can rot. I only refilled the tray from below.
The Second Week: Results and Problems
By day 10, the moss had formed a dense mat. The Sarracenia pitchers darkened to a deeper red. I measured growth: the moss expanded by about 1.5 inches outward. The Sarracenia grew two new pitchers.
But then I made a mistake. I moved the pot to a spot with only 4 hours of direct sunlight. Within three days, the moss turned pale, and the pitchers elongated weakly. I moved it back to full sun. By day 14, the vitality returned. The lesson? These plants are light hogs.
I also noticed a fungus gnat issue. The moist surface attracted them. I introduced a small colony of springtails—they’re harmless and eat decaying matter. Problem solved.
Newcomers’ 3 Critical Mistakes
After killing my first three dwarf Sarracenia setups, I learned these mistakes. Don’t repeat them.
Mistake 1: Overwatering
This is the biggest killer. 90% of indoor plants die from overwatering, and dwarf Sarracenia aren’t any different. Many beginners think “bog plant” means constant soggy soil. Actually, the roots need oxygen. The tray method provides consistent moisture without drowning the roots. I used to mist the leaves daily—bad idea. The condensation led to stem rot. Now I only keep the tray filled with half an inch of distilled water. If I see algae forming on the moss surface, I let the tray dry out for 12 hours before refilling.
Mistake 2: Wrong Light Placement
I once placed my setup under a grow light that was too weak. The moss stretched toward the light like it was desperate. The Sarracenia stopped producing pitchers. I’ve since learned that both the moss and the pitcher plant need direct sunlight for at least 6 hours a day. If you’re growing indoors, use a full-spectrum LED at 12 inches distance for 14 hours a day. Partial shade is a death sentence for these combos.
Mistake 3: Using the Wrong Pot Type
I tried ceramic pots twice. Both times, the moss dried out within hours. Ceramic is porous; it wicks moisture away. Plastic or glazed ceramic pots work better. Also, avoid deep pots. Dwarf Sarracenia have shallow root systems. A deep pot keeps the bottom too wet while the top dries out. Stick to shallow, wide containers.
Long-Term Care for the Pairing
Once the moss establishes, it requires minimal intervention. I check the water tray every three days. During summer, evaporation is faster, so I refill daily. In winter, I reduce watering to once a week, but I keep the moss from completely drying out.
I prune dead pitchers in early spring. This encourages new growth. The moss doesn’t need trimming—it naturally stays low. If it gets too thick, I lift a patch and replant it elsewhere.
Fertilizing is unnecessary. Both Sarracenia and moss get their nutrients from prey or the air. Feeding them with fertilizer burns the roots.
FAQ: Common Questions from New Growers
Q: Can I use tap water for watering?
No. Tap water contains minerals that accumulate in the peat moss. This changes the pH and kills the moss. I always use distilled water or rainwater. I collect rainwater during storms and store it in a sealed container. If you have to use tap water, let it sit for 24 hours to evaporate chlorine, but it’s still risky.
Q: How do I prevent mold on the moss?
Mold usually happens when air circulation is poor. Place the setup near a fan or in a breezy area. If you see fuzzy white growth, scoop it out with a spoon. Then reduce the water level in the tray slightly. Mold often appears when the moss is too wet and the room is humid.
Q: Will the moss overtake the Sarracenia?
Some moss species, like sphagnum, grow aggressively. Dwarf cultivars are slow-growing, so the moss can smother them. To avoid this, plant the Sarracenia slightly above the moss surface. I place the base of the plant at the same level as the pot rim. Then the moss grows around it, not over it. If it gets too dense, I prune the moss back to a quarter inch.
Final Thoughts on Pairing Dwarf Sarracenia with Moss
This pairing works when you respect the plants’ needs. I failed repeatedly until I understood the balance of water, light, and container choice. Honestly, the two-week test showed me that the moss acts as a living mulch. It keeps the roots cool in summer and stable in winter.
If you’re starting, pick one dwarf cultivar and one moss species. Master that first. Then expand. I’ve seen people create beautiful mini bog gardens in just a plastic tub with these combos. It’s simple once you stop overcomplicating it.
The key takeaway? Let the moss do the work. It will tell you if the environment is right. If the moss grows green and dense, your Sarracenia will flourish. If the moss turns yellow or brown, something is off. Trust the moss as your indicator.
I’ll leave you with this: I killed my first potted Sarracenia by overwatering it in a ceramic pot under a window with indirect light. I’ve since given away three healthy setups to friends. The difference was understanding the companion moss relationship. You can do it too—just follow these steps and observe daily.





