 bluename
Sarracenia Indoor Lighting Setup for Year Round Growth 5 Tips
If you want your Sarracenia to thrive indoors, you need a serious lighting setup. Full stop. I learned this the hard way after killing three plants in one winter. The short answer? You need a strong grow light running 12 to 14 hours a day, placed 6 to 12 inches above the plant. That is the non-negotiable baseline. Everything else is fine-tuning, and that is exactly what I will break down for you today.
I remember unpacking my first pitcher plant. I was so excited. I placed it on a bright windowsill. I thought that was enough. Within a month, the pitchers turned brown and crispy. The plant looked like a sad, dried-out husk. That is when I realized indoor Sarracenia care is a whole different game than outdoor growing.
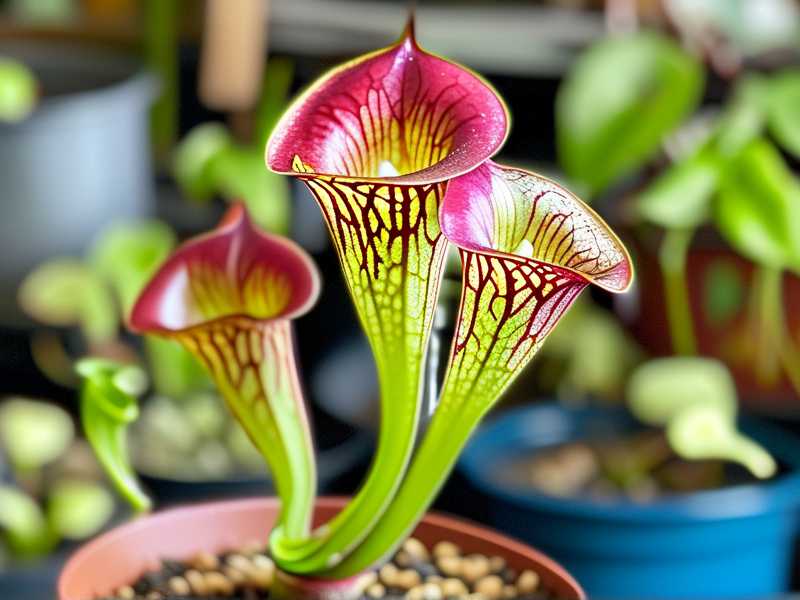
Here is the truth: 90% of indoor plants die from overwatering, but Sarracenia often die from light starvation. These are bog plants. They are used to full, blazing sun from dawn until dusk. A North-facing window will never cut it. Even a South-facing window often falls short during winter months. You have to bring the sun inside with technology.
So, let me share my five best tips for setting up indoor lighting that keeps Sarracenia happy all year. These are born from real mistakes, real dead plants, and finally, real success. My current collection has been thriving for over two years under lights.
Tip 1: Ditch the Windowsill, Embrace the Grow Light
I tried the windowsill route for a whole season. My plants survived, but they did not thrive. Growth was stunted. Pitchers were small. Colors were washed out, more green than the deep reds and purples I craved.
The turning point was buying a proper LED grow light. Not a tiny clip-on thing. I am talking about a panel or a bar light with a decent wattage. I started with a cheap blurple light, and honestly, it worked, but it made my living room look like a UFO landing site. Now I use a full-spectrum white LED. Much better for my eyes and the plants seem to like it more too.
The key metric is PPFD, or how much usable light hits the plant. You want around 200 to 400 µmol/m²/s at the leaf surface. If that sounds complicated, do not worry. I just check the manufacturer specs. The brand I use, Spider Farmer or Mars Hydro, they list the PPFD at different heights. I hang the light so the plant gets that target range.
I have found that my Sarracenia respond best when the light is closer. I keep mine about 10 inches above the tallest pitcher. Too far away, and they stretch and flop over. Too close, and the leaves can get light burn, which looks like pale, bleached spots. It is a balancing act, but you will find the sweet spot.
Tip 2: Duration Matters More Than You Think
I used to think intensity was everything. I was wrong. Photoperiod, the number of hours the light is on, is just as critical. These plants are adapted to long summer days. They use this signal to grow actively.
During the growing season, I run my lights for 14 hours a day. I have a smart plug that turns them on at 7 AM and off at 9 PM. It is set and forget. This gives the plants a consistent, predictable "daytime." They love it.
In the winter, I switch to 10 hours a day. This mimics the shorter days of their natural habitat. This signal helps them prepare for a period of rest. It is not mandatory indoors, but I have found my plants look much better the next spring when I give them this 'winter mode.' Some growers skip this, but I noticed a big difference in vigor after I started adjusting the timer.
One thing I learned from a forum on RHS is that consistency is key. Irregular lighting schedules stress the plants. That is why a timer is a must-have. Do not just switch it on and off whenever you remember. Your Sarracenia will appreciate the routine.
Tip 3: Choose Your Light Spectrum Wisely
There is a lot of debate about light spectrums. I have tried both the old-school "blurple" lights and modern full-spectrum white lights. I am sticking with full-spectrum.
Here is why. The plant uses red and blue light for photosynthesis. But the far-red and green wavelengths seem to play a role in other processes. Plus, with a white light, I can actually see the true colors of my plants. Those deep reds and burgundies pop beautifully. Under blurple light, everything looked the same shade of purple.
Many high-end grow lights now include UV and IR diodes too. I am not sure if my Sarracenia strictly need UV, but I have read that it can intensify coloration. I bought a light with UV for my last upgrade, and my plants do have richer colors than before. It might be a coincidence. But I will take it.
Check out guides like those referenced by AHS for more on horticultural lighting. They have some great general advice on plant care, although for Sarracenia specifics, you really do need dedicated carnivorous plant forums. The science is still catching up with what hobbyists are doing. My rule of thumb is to keep it simple. A high-quality full-spectrum light works for almost everything.
Tip 4: Manage Heat and Distance to Avoid Scorching
I made a major error when I first hung my light. I thought more power meant better. My light was too strong and hung too low. My Sarracenia got what looked like sunburn. The leaves developed ugly, bleached, brown patches. It was heartbreaking.
The fix was simple. I raised the light higher. I also realized that my setup was generating a lot of heat. Sarracenia do not mind heat, but intense heat combined with strong light and dry air is a recipe for disaster.
Now, I measure the temperature at the leaf level. I aim for around 70-80°F (21-27°C) during the day. If the leaves feel hot to the touch, the light is too close. I also added a small oscillating fan to my grow space. It helps with air circulation, which prevents fungal issues and keeps the temperature even. This was a huge game-changer for me.
You want to avoid the scenario where the light is so close it cooks the plant. Start with the light higher than you think is necessary. Then, observe. If the leaves are stretching and pale, lower it slightly. If they are burning, raise it up. Let the plant tell you what it needs. I check on my plants every day, but I really only adjust things once a week at most.
Tip 5: Don't Forget the Dormancy Cycle
This is the tip that separates the pros from the beginners, I think. Sarracenia are temperate plants. They are used to a cold, dark winter. If you keep them in constant summer conditions with 14 hours of light, they will eventually exhaust themselves.
I tried growing them with constant light and warmth for two years. They grew, but they got weaker. Pitchers were smaller. The crowns felt mushy. I read that they required dormancy. I ignored this because it was warm inside and I wanted them to grow year-round. Big mistake.
Now, I force a rest period. From roughly November to February, I move my Sarracenia to a cooler spot. My garage works. It gets cold but stays above freezing. You need temperatures between 35-45°F (2-7°C) for a good 8-12 weeks.
During this time, I cut back the lighting to about 6 hours a day. The growth slows right down. The leaves might die back a bit. That is okay. It is alive. It is resting. This is not seasonal depression; it is survival. When I bring them back out in late winter and increase the light hours again, they explode with new growth. The spring flush is more robust than anything I got with constant growth. This is the final piece of the puzzle. It resets the plant's biological clock.
Common Newbie Mistakes to Avoid Like the Plague
I have been where you are. I have bought the plant, read the online guides, and killed it anyway. Here are the three main reasons my first Sarracenia died. Save yourself the heartache.
Mistake 1: Watering Like a Normal Houseplant You cannot water a Sarracenia like a fern. They are bog plants. Their roots need to be in constantly moist, or even wet, soil. If you water them from the top and let the soil dry out, they will die.
I used to water mine once a week until the water ran out the bottom. That was wrong. The soil dried out completely between waterings, and the roots were damaged. They are not drought-tolerant.
The Fix: The tray method is the only way to go. Fill a saucer or tray with distilled water or rainwater. Put the pot in the tray. Keep about an inch of water in the tray at all times. The soil will wick up the water it needs. This mimics their natural environment. I only worry about topping up the tray now. I never water the soil directly. It is a much more foolproof system.
Mistake 2: Assuming They Love Full Sun Indoors This is the lighting trap I talked about earlier. "Full sun" for a Sarracenia outdoors equals "blazing light" indoors. But the intensity drops dramatically through a windowpane. UV light is filtered out, and the overall lux and PPFD levels plummet.
I thought my brightest windowsill was perfect. In reality, my plants were in twilight conditions for them. They were slowly starving for light. They produce food through photosynthesis. No light means no energy. No energy means death.
The Fix: Do not even try windowsill growing for the long haul. Get a grow light. I have said it before, and I will say it again. It is the single best investment you can make for indoor Sarracenia. Think of the grow light as their lifeline. If you only buy one accessory, make it a timer and a grow light. You will see the difference in a week.
Mistake 3: Using the Wrong Pot and Soil This is an easy one to overlook. I remember potting my first Sarracenia in a nice, decorative ceramic pot with standard potting soil. It suffocated and rotted. These plants have very specific root requirements.
First, the soil. They are carnivorous plants. They have evolved to live in nutrient-poor, acidic soils. Standard potting mix is fertilizer-laden and has the wrong pH. It will burn the roots and invite rot. I use a mix of sphagnum peat moss and perlite. That is it. Usually a 50/50 mix. No fertilizer. No compost. Nothing else.
Second, the pot. They have long root systems. A tall, narrow pot is better than a short, wide bulb pot. Also, the pot material matters. I prefer plastic. It keeps the soil cooler and retains moisture better than terracotta. Terracotta wicks away moisture and can build up mineral salts, which are toxic to these plants. A plastic pot in a tray of water is the perfect setup. It is simple, functional, and safe.
How to Set Up Your Lighting: A Simple Step-by-Step
Here is exactly what I do. It is not complicated, but it works.
First, I choose my location. I have a spare shelf in my living room. It is away from drafty windows and heating vents.
Second, I set up my light. My light is a quantum board style LED. I hang it on a ratchet rope from the top of my shelf. This lets me adjust the height easily.
Third, I measure the distance. I start with the light at 14 inches from the top of my plants. I leave it there for a few days. I watch for signs of stress.
Fourth, I plug my light into a smart plug. I set the schedule in an app on my phone. 14 hours on, 10 hours off during spring and summer. I adjust it to 10 on, 14 off for winter.
Fifth, and this is critical, I check the temperature and humidity. I have a small digital thermometer near the plants. I notice the temperature stays around 75°F with the light on. If it gets higher than 85°F, I raise the light or turn on a small fan.
Over two weeks, I did this and saw a dramatic change. Old, sad pitchers slowly gave way to new, fleshy growth. The new pitchers were taller and had that vibrant red veining that made me fall in love with the plant in the first place. The transformation from a plant in survival mode to a plant actively thriving was incredibly satisfying. It all comes down to giving it the light it craves.
FAQ
1. Can I use a regular household LED bulb for my Sarracenia? No, a standard household bulb is not going to work well. It is simply not powerful enough. The light is too weak and often the wrong color temperature. You need a dedicated grow light, which has a much higher intensity and often a better spectrum for photosynthesis. It is worth the extra money. A quality grow light will last for years.
2. How many hours should my Sarracenia grow light be on each day? It depends on the season. In the spring and summer, I run my lights for 14 hours a day. This is their main growing season. In the fall and winter, I reduce it to 10 hours a day to help trigger dormancy. It is crucial to mimic the natural seasonal light changes for long-term health.
3. My Sarracenia is turning yellow. Is that a light problem? It could be multiple things. Underwatering in a tray system is unlikely, but if your roots are rotting, the plant will yellow. Overfeeding through tap water can cause issues. However, if you are using distilled water and a tray method, yellowing is almost always a light issue. Check if the light is too close, causing bleach spots, or too far, causing weak, yellow growth. Mine did the latter, and moving it closer fixed the problem in a few weeks.
Getting Sarracenia lighting right is not magic. It is just science you can apply at home. My first attempts were a disaster. But every mistake taught me something. The dead plant taught me about light intensity. The burning taught me about distance. The weak growth taught me about photoperiod.
Now, my setup is almost automatic. The lights are on a timer. The trays keep the roots wet. The seasonal schedules are set. It takes almost no daily effort, but the payoff is incredible. Watching a new, perfect pitcher unfurl and color up is one of the most rewarding things in my plant hobby.
I hope these tips save you from the same heartbreak I went through. Start with a strong light. Get a timer. Match the day length to the season. And do not be afraid to tweak the setup. Your plants will tell you what they need. You just have to listen. Good luck, and happy growing.





