 bluename
How to Select Healthy Sarracenia Seedlings When Buying: 6 Tips
Let me start with the straight answer. When buying Sarracenia seedlings, you must check for firm rhizomes, vibrant new growth, and moist but never soggy soil. Avoid any plant with blackened bases or wilted pitchers. That single tip would have saved me three plants and about $80 in my first year. I learned this the hard way.
I have been growing carnivorous plants for over eight years now. I have bought seedlings from nurseries, online marketplaces, and even big-box garden centers. I have also killed my fair share. Actually, I killed more than my fair share. But I figured out what works. You need to look past the pretty pitchers and inspect the fundamentals.
Many people think Sarracenia are hard to grow. That is not the real problem. The real problem is that people buy sick or stressed plants without knowing it. Then they blame themselves when the plant dies. Sometimes it is not your fault. Sometimes the seedling was doomed from day one. So let me show you exactly what to check before you hand over your money.
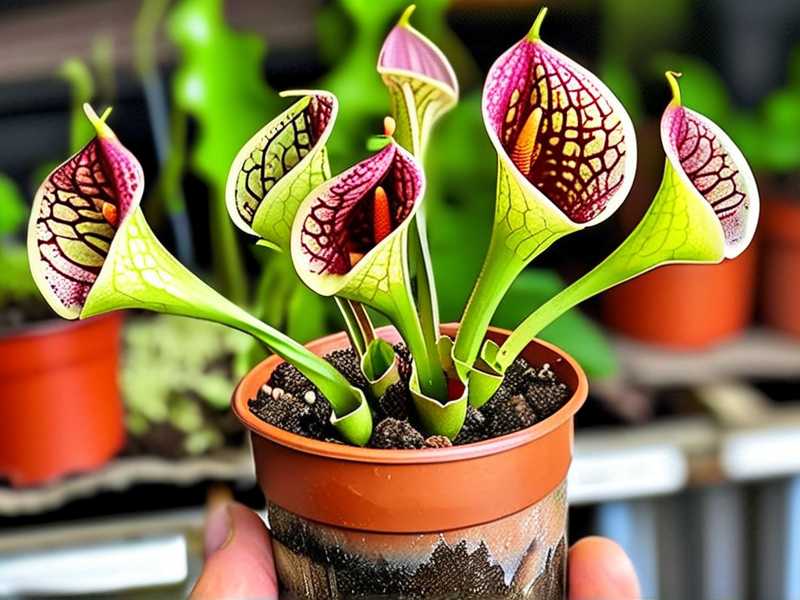
Why the First 100 Words Matter for Your Sarracenia
You probably found this article because you are worried. Maybe you already lost one plant. Maybe you are staring at a wilting seedling right now. I get it. I have been there. That is why I am going to walk you through six concrete tips for selecting healthy Sarracenia seedlings. These tips come from real experience. I made every mistake in the book so you do not have to. And look, the market is full of beautiful photos. But photos lie. You need to trust your eyes and your hands. Check the rhizome, inspect the leaves, ask about the watering schedule. Yes, ask. A reputable seller will tell you honestly.
The 3 Deadliest Mistakes New Growers Make
Before I get into the buying tips, I need to address something critical. Most Sarracenia deaths are not caused by the plant being weak. They are caused by something you do after you bring the plant home. Let me break down the three biggest errors.
Mistake #1: Overwatering
This is the number one killer. Without question. 90% of indoor plants die from overwatering and Sarracenia are no exception, just for different reasons than you might think. Sarracenia love wet feet. They are bog plants. But they hate drowning roots. The problem comes when the soil stays soggy with no air circulation. The rhizome rots. I remember my first seedling, a beautiful S. purpurea. I kept its tray constantly filled with water. I thought more was better. Three weeks later, the center leaves turned black and pulled out with a soft tug. The rhizome was brown mush. That was my lesson number one. Use the tray method but let the tray go dry for a day between waterings. This keeps oxygen flowing to the roots.
Mistake #2: Wrong Light Placement
Sarracenia are sun worshippers. They need full, direct sun for at least six hours daily. Indoors, that means a very bright south-facing window or strong grow lights. Many people put them on a desk or a shelf with ambient light. That is a death sentence. The plant goes dormant in terms of growth but stays alive energetically. It gets weak. Pitchers stop forming. And within two months, the plant collapses. I tried growing one on my bathroom windowsill because I thought the humidity would help. Big mistake. The pitchers grew stretched and floppy. The color faded. It eventually died, and it was 100% my fault for not giving it the light it demanded.
Mistake #3: Using the Wrong Pot
Sarracenia have deep roots. Actually, they have surprisingly deep rhizomes that grow horizontally. They need pots that are tall and narrow, not short and wide. Plastic pots work best. Ceramic and terracotta pots are terrible because they leach minerals into the soil and dry out unevenly. Plus, terracotta wicks away moisture from the top. That creates dry spots in the root zone. Plant roots hate that. I use tall nursery pots, usually 4 inches deep at minimum for seedlings. You want at least 4 to 6 inches of depth, even for small seedlings. The roots grow down faster than you think. Also stay away from glazed decorative pots without drainage. They are fatal. You need holes on the bottom for water to move through.
How to Select Healthy Sarracenia Seedlings: 6 Tips That Actually Work
Now that we have cleared the air, let me walk you through the actual selection process. I am going to share six tips in the order I personally check them. I do this every single time now, even with trusted suppliers. It takes about two minutes per plant. That is two minutes that can save you months of heartbreak.
Tip 1: Inspect the Rhizome First, Not the Pitchers
I know the pitchers are what you want to see. They are stunning. But the pitchers do not tell the truth. The rhizome does. The rhizome is the thick, fleshy stem that sits just below the soil surface. It should feel firm, solid, and have a slightly cream or white color. If you can gently push the base of the plant with your finger and it feels mushy, leave it. That is rot.
I remember visiting a nursery in Oregon once. They had a beautiful specimen with deep red pitchers. I almost bought it. But I had learned my lesson. I pressed the base gently, and the outer tissue slid off. It was soft and brownish. I put it back on the shelf. The seller looked surprised and said, "That one was fine yesterday." We both knew it was not. I bought a smaller, less colorful plant nearby with a very firm base. It is still alive today, five years later.
Check the point where the leaves emerge from the rhizome. That growth point should look greenish or slightly red, active. If it looks brown, sunken, or dried out, the plant is struggling. Pass on it.
Tip 2: Look for New Growth, Not Just the Big Pitchers
A healthy seedling will have active new growth. That means the newest leaf or the emerging pitcher looks younger than the rest. It shows the plant has energy. If you see only old, mature pitchers and no new central growth, the plant is stalled. It could be dormant, but it could also be sick.
Sarracenia go dormant in winter. If you are buying in spring or summer and the plant has zero new growth, that is a red flag. In fact, a healthy plant pushes out new pitchers continuously during the growing season. I usually count the number of new spears emerging at the center. Two or more is ideal.
My first healthy purchase had three new spears at the center. I was worried they were too small. But within two weeks, they unfolded into fresh, green pitchers. That was the moment I understood what "active" really looked like. Now I never buy a seedling without at least one new spear poking out.
Tip 3: Check the Pitcher Condition and Color
The existing pitchers tell you about recent stress. Look for pitchers that are crisp, not wrinkled. Wrinkled pitchers mean dehydration, which is common after shipping. But if the plant has been sitting in a nursery with wrinkled pitchers for weeks, that is bad husbandry. A few brown tips are normal, especially on older pitchers. That is not a deal breaker. But if the pitchers have black patches that are spreading, especially down toward the base, that could be a fungal infection. Pass on those.
Color is also a clue. Many Sarracenia turn red in full sun. If the plant is green and floppy, it might have been grown under heavy shade. That is not a disease, but it is a warning. The plant will need a slow acclimation to bright light. If you are a beginner, this is a burden you do not need. Pick one that is already brightly colored and compact. Compact growth usually means it received plenty of light.
Tip 4: Examine the Soil, the Pot, and the Drainage
The soil mix matters, but the condition of the soil tells you more. Good Sarracenia soil is a mix of peat moss and perlite or sand. It should look porous, not dense clay-like. If the soil is black, waterlogged mud with a film on top, that is a bad sign. It suggests the nursery overwatered or used poor-quality peat.
Peek at the drainage holes in the bottom of the pot. Do you see roots poking out? Healthy white or tan roots are great. Black or brown mushy roots mean root rot. I know you cannot always see the roots easily. I bought one online once, and when I popped it out of the pot, the entire root system was black slime. The plant looked fine on top. That taught me to always ask for a photo of the root system before buying online. If the seller refuses, that alone is a red flag.
Tip 5: Ask Questions and Trust the Seller\'s Answers
Do not be shy. Ask about the plant\'s growing conditions. Was it grown outside or in a greenhouse? Was it recently shipped? How long has it been in this pot? A good grower answers these questions confidently. They will also ask you about your setup and give advice. That is a sign they care.
I have bought from both big nurseries and small independent growers. The independent ones are more likely to tell you about quirks, like a particular plant that grows slower or needs more sun. In contrast, big box stores often just want to move inventory. I bought a Sarracenia from a large chain store once. The tag said "dormant in winter." That was it. No care guide. The plant was root bound in a tiny, wet pot. It died within a month. Now I prefer specialist nurseries. Or online shops with good reviews and real photos, not stock images.
You should also ask about the plant\'s last repotting. Seedlings do not need repotting often, but the media should not be exhausted. Fresh media is lighter and fluffier. Old media becomes compacted and turns to slime over two years. If the seller does not know, that is not necessarily a deal breaker. But if the pot smells sour or swampy, forget it. Smell is a powerful tool. Healthy soil is earthy, not foul.
Tip 6: Choose Seedlings Over Mature Plants for Your First Time
This might seem counterintuitive. Would a larger mature plant be more forgiving? Not really. Mature plants are expensive and sometimes slow to acclimate to a new environment. Seedlings are cheaper and actually adapt faster to your home conditions. They grow quickly, too.
With seedlings, you have less invested, so you can experiment. And if you follow proper care, you watch them transform within a season. That is a deeply rewarding experience. The first seedling I raised to maturity took two seasons. But watching it produce its first massive pitcher was worth it. Now I always recommend people start with a robust seedling, not a showpiece plant.
A Two-Week Observation Plan After You Buy
Biuying the right plant is half the battle. The other half is the first two weeks in your home. Let me give you a quick timeline I use. I follow this every time. It has dramatically lowered my loss rate.
Day 1 to 3: Acclimation
Do not repot the seedling immediately. Let it rest in its original pot for several days. I place it in bright, indirect light for the first day. Then I move it into direct morning sun, which is gentler. At night, I move it back to a sheltered spot. If the plant was shipped, it needs time to rehydrate. I mist the pitchers lightly with distilled water once a day during this initial period. Do this in the morning, not evening, to avoid mold. I keep the tray dry for the first 24 hours to let the soil breathe. Then I add a shallow layer of water, about half an inch, and let it evaporate fully before refilling.
Day 4 to 7: Slow Sun Introduction
Once the plant seems stable, I gradually increase sun exposure. I add one extra hour of direct morning sun each day. By day seven, it should be in full sun for at least four to five hours. Watch for signs of sunburn. Sarracenia leaves can bleach or develop brownish, papery patches if they were not used to strong sun. If you see this, pull back the intensity for a couple of days. But do not panic. Slight leaf burn on old pitchers is okay. New growth will adapt.
Day 8 to 14: Observe New Pitchers
The key benchmark is new growth. By the start of week two, you should see the central spear continuing to grow. It might even be taller. If the spear is visibly growing, the plant has acclimated. Keep the same watering rhythm. Do not fertilize the soil. Sarracenia are carnivorous, meaning they get nutrients from insects. Feeding them through the roots will burn them.
At the end of week two, if the new pitcher has fully opened or is at least halfway there, you are in good shape. If the central growth is yellowing or stalling, something is wrong. Check the light first, then check the water level. Also, check for pests like aphids, which love Sarracenia new growth. A tiny aphid infestation can really slow down a young plant.
Real Mistakes I Made and How You Can Avoid Them
I want to share the exact story of killing my second plant. It is painful but educational. After my first overwatering disaster, I went the opposite direction. I under-watered. I thought I was being careful. I let the tray go dry for three days straight. The plant sat in bone-dry peat. Within two weeks, the pitchers withered from the tips down. The whole plant looked crispy. I thought it was dead. I almost threw it away. But I let it sit in a tray of water for a day, and the rhizome miraculously produced a new spear. It survived, but it was set back an entire season.
My third plant died from sunburn. I got a beautiful dark S. flava from a greenhouse. The grower grew it under 50% shade. I put it directly in full Texas sun. The new growth bleached white within three days. The leaf tissue literally cooked. I had no idea the plant needed a gradual introduction to light. The scorched leaves eventually died, but the rhizome lived. It pushed out new growth after I gave it some shade for a week.
I have also killed a plant with the wrong potting media. I used regular potting mix once because I was out of peat. That was a horrible decision. The fertilizer in standard potting mix burned the roots. The plant turned yellow and stopped growing. I pulled it up a month later, and the roots were dark and damaged. Do not ever use standard potting soil for Sarracenia. Use unfertilized peat moss and perlite, or clean silica sand. That is non-negotiable.
Tips for Buying Sarracenia Online vs In-Store
Buying locally has advantages. You can inspect the plant in person. You can see the color, feel the rhizome, and even smell the soil. I always prefer in-person shopping for this reason. But online has a much wider selection. Some rare species are only available online. If you buy online, follow these extra steps:
First, ask the seller about their packaging. Sarracenia need careful packing so that the rhizome does not shift during shipping. A loose plant in a box can have its roots stripped. Second, request a photo of the actual plant you are buying, not just a stock photo. Third, ask about the current dormancy status. If you buy a plant in mid-winter that is fully dormant, you cannot expect immediate growth. Dormant plants look dead, but they are not. You have to be very careful during repotting when the plant is dormant.
In-store buying used to be hit or miss. But here is a trick. I ask the store manager when they receive their plant shipments. I try to visit on delivery day or the day after. Plants that have been sitting in a display for three weeks under fluorescent lights are already struggling. They are a known death spiral. Delivery-day plants are still fresh. They have not accumulated drainage issues from careless customers who pour water into every pot.
Understanding Sarracenia Dormancy When Buying
This is a topic that confuses many beginners. Sarracenia are temperate plants. They require a winter dormancy period. If you buy a plant in mid-October and it looks brown and shrunken, it might be entering dormancy, not dying. I made the mistake of thinking a dormant plant was dead. I kept it indoors in the warmth and continuous light. That completely disrupted its cycle. It never went fully dormant, and it exhausted itself over the winter. By spring, it had no energy for new growth. It slowly declined.
When you buy in the fall, check if the plant is still actively growing or if it is going dormant. A dormant plant will have shorter, sturdier pitchers and a more compact crown. The roots may be darker. That is normal. Do not aggressively repot a dormant plant. Wait for spring. Just keep it slightly moist in a cool, bright location. For indoor growers, you can simulate dormancy by moving the plant to a cool garage or basement that stays around 40 to 50°F (4 to 10°C). Some people use a fridge method, but that is tricky for beginners.
If you are buying in spring or summer, verify that the plant has come out of dormancy. You should see active growth. That is the ideal time to buy. The plant has a whole season ahead to establish in your care.
The Crucial Role of the Royal Horticultural Society (RHS) and American Horticultural Society (AHS)
I want to point out a widely cited guideline. According to the RHS, Sarracenia are relatively hardy plants for temperate zones, but key cultivation factors include full sun and lime-free (mineral-free) water. Many beginners fail because they use tap water, which contains dissolved minerals. These minerals accumulate in the soil over time and eventually burn the roots. Distilled water, rainwater, or reverse-osmosis water is essential.
The AHS also emphasizes the importance of cool winter dormancy for temperate carnivorous plants. Their consumer guidance often reminds growers to avoid high humidity combined with cold and wet soil, which is a recipe for stem rot. I follow both these organizations\' recommendations closely. They are not just for professional horticulturists; the advice translates directly to healthy houseplants.
Key Takeaways for Buying Sarracenia Seedlings
Let me give you a quick mental checklist. I scroll through this every time I am about to purchase a new plant. You should too.
- Firm rhizome, no mushiness. Pass on mushy.
- Active new growth, at least one visible spear.
- Pitchers crisp, no spreading black rot.
- Soil mix is airy, not compacted slime.
- Drainage holes are clear, roots visible and white or tan.
- Seller can answer your questions about light, water, and dormancy.
If all six checks pass, you can proceed with confidence.
Frequently Asked Questions
Q1: Can I keep my new Sarracenia seedling indoors? Yes, but only with strong artificial lighting or a south-facing window that gets six to eight hours of direct sun. In low-light rooms, they will weaken. I personally use a grow light in winter and put them outside in summer. Indoor growth is possible, but you must be committed to high light levels.
Q2: How often should I water after bringing the seedling home? For the first two weeks, follow this rule. Put the pot in a tray of water, but only about half an inch. Let the tray completely dry out for a full day every one to two days. Never let the soil become bone dry for long, but never let the pot sit in weeks of stagnant, deep water. The goal is consistently moist, not saturated.
Q3: What if my seedling starts to turn brown after a week? Do not panic. Check the growing point first. If the center spear is still green and growing, the browning is just old pitchers dying off due to acclimation stress. That is normal. If the center is also turning brown or black and pulls out easily, that is rot. Remove the seedling from wet media, cut off the rotted parts, and repot in fresh, drier media. Place it in bright, indirect light until it recovers.
Buying a Sarracenia seedling is an exciting step. But it can quickly turn into frustration if you bring home a problem plant. Use the six tips I shared. Check the rhizome, look for new growth, examine the pitchers, inspect the soil, ask questions, and choose a seedling if you are new. After you bring it home, give it two weeks to acclimate. Follow the observation schedule and keep your watering and light in check. I have been in your shoes, feeling the disappointment of a withered pitcher. But I have also felt the pure joy of watching a tiny seedling turn into a monster pitcher plant. That joy is worth the effort. Trust me.





