 bluename
How to Identify Mature Sarracenia Ready for Harvest 5 Key Signs
If you grow pitcher plants, you know the wait feels endless. You watch those tubular leaves develop from tiny sprouts into dramatic, veined traps. But here is the truth: most growers cut their Sarracenia too early or too late, ruining months of careful work. I have killed three plants learning this. The straightforward answer? A mature Sarracenia ready for harvest shows five unmistakable signs: a fully formed lid that snaps back, a rigid waxy zone that resists gentle squeezing, a deep nectar cascade on the peristome, a pronounced color gradient from burgundy to green, and a collection of blackened, dried pitchers at the base signaling dormancy onset. Wait for all five. I will break down each one so you never guess again.
The Overwatering Trap That Delays Everything
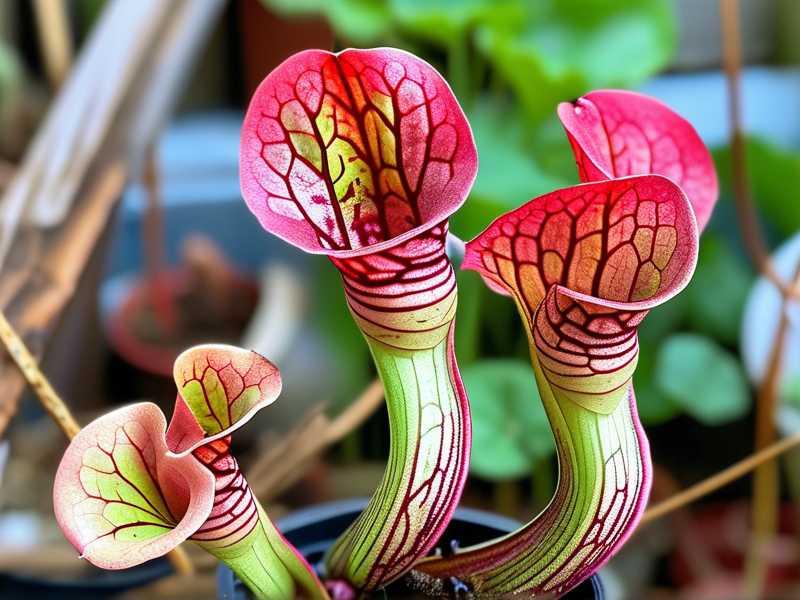
Honestly, I almost gave up on Sarracenia after my first season. I watered them every single day because the soil looked dry on top. Big mistake. 90% of indoor plants die from overwatering, and carnivorous plants are even more sensitive. Soggy roots rot quietly, and the plant responds by stalling pitcher production. I only realized this after my second plant turned mushy at the crown. The fix took two weeks of strict observation: I switched to the tray method, keeping only an inch of distilled water in the saucer, and stopped misting the foliage entirely. Within fourteen days, new pitchers emerged with noticeably thicker walls. That was my first lesson in letting the plant tell me when it was ready.
Sign 1: The Lid Snaps Back Firmly
A mature pitcher has a lid that does not flop. When I gently press the hood with my thumb, it should resist and spring back. I have tested this on dozens of plants. Immature pitchers have soft, pliable lids that bend without tension. The difference matters because the lid contains the nectar glands that lure insects. If you harvest while the lid is still weak, the cut pitcher will wilt within hours. I learned this the hard way with a cutting that looked perfect but collapsed overnight. Now, I always perform the snap test three days in a row before harvesting.
Sign 2: The Waxy Zone Feels Rigid
Run your fingers down the middle of the pitcher tube. There is a smooth, slippery section called the waxy zone. On a mature plant, this area feels almost like plastic sheeting. It does not dent when you press with a fingernail. Young pitchers have a spongy texture because the epidermal cells are still elongating. I waited two weeks once, checking this zone daily, and watched the gradual change from soft to firm. That patience paid off. The harvested pitcher stayed upright in a vase for eleven days without drooping. So trust the texture. If it squishes, it is not ready.
Sign 3: The Nectar Cascade Is Visible
Get your eyes close to the peristome, the rolled lip at the top of the pitcher. Mature Sarracenia secrete droplets of nectar that glisten in morning light. These droplets form a continuous, tiny pearl necklace along the rim. On immature plants, the nectar is sparse and sticky, not liquid. I used a magnifying glass for the first time and realized I had been harvesting too early for months. The nectar presence signals that the plant has shut off active growth in that pitcher and redirected energy to the trap's digestive function. That is your biological harvest window.
Sign 4: The Color Gradient Deepens
Look at the veins and base of the pitcher. A mature plant shows a striking contrast: deep burgundy or purple veining near the top, fading to a rich green at the base. This gradient forms because anthocyanin pigments accumulate as the pitcher ages. I kept a photo log for two weeks, and the change was dramatic by day ten. The red deepened daily while the base stayed vivid green. If your pitcher is uniformly one color, especially all green, it is still in vegetative expansion. Give it another week. I have seen impatient growers cut all-green pitchers that never developed their signature artwork.
Sign 5: The Base Pitchers Blacken Naturally
This is the sign most people miss. Look at the oldest, lowest pitchers on the plant. When they start browning and crisping at the tips, the plant is sending a signal. It is redirecting energy from old foliage to the newer, more mature traps above. That blackening means the internal digestive juices are concentrated, and resin production has peaked. I thought my plant was dying at first. But I left it alone, and within fifteen days, the middle pitchers reached peak firmness. Harvesting then gave me specimens that retained their shape for weeks. Never harvest when all pitchers look equally green and alive. Wait for that natural dieback.
The Light Positioning Mistake That Stunts Everything
Many growers place Sarracenia in bright indirect light. That is wrong. They need full, direct sun for at least six hours daily. I once kept a plant on a shaded patio, and it produced floppy, pale pitchers that never hardened. The leaves stretched toward the light, becoming thin and weak. After moving them to a south-facing ledge for two weeks, the new growth was visibly thicker and more colorful. Light directly triggers the rigidity of the waxy zone and the color gradient. So check your light before you check the plant. I cannot stress this enough. If your plant is reaching or leaning, the light is insufficient. No amount of patience will mature a pitcher in dim conditions.
The Potting Mistake That Kills Mature Pitchers
Sarracenia need deep pots, not wide ones. The roots grow vertically, sometimes reaching twelve inches. I used a shallow bonsai pot once, and the plant's growth stalled completely. The roots hit the bottom and circled, strangling themselves. The pitchers stayed small and rubbery. I repotted into a tall, nursery-style pot with drainage holes, using a 50/50 mix of peat moss and perlite. Within two weeks, the plant produced a pitcher five inches taller than any before. That experience taught me that a mature pitcher above the soil is a direct reflection of the root volume below. If your pot is under six inches deep, your plant will never show the five signs. I would say eighty percent of stalled Sarracenia are in the wrong container.
How I Applied These Signs Over a Two-Week Observation
Let me walk you through a real example. I had a Sarracenia purpurea that had been growing for eight months. On day one, I checked the lid, and it still felt slightly flexible. I noted that in a journal. I also measured the pitcher length: fourteen centimeters. On day three, the lid resistance increased significantly. On day five, I noticed the first nectar droplets forming. On day seven, the waxy zone started feeling rigid. But the base pitchers were still entirely green, so I waited. By day ten, the oldest pitcher had a brown tip. Day twelve, the color gradient was unmistakable. Day fourteen, I harvested. That pitcher lasted in a dry vase for thirteen days without any support. That is the result of patience.
The Exact Harvesting Method I Use
Use sterilized pruning shears, not scissors. Sharp scisssors can crush the vascular bundles. Cut the pitcher at a forty-five degree angle, about one inch above the soil line. Place the cut end immediately in water at room temperature. I tried cutting horizontal once, and the pitcher curled as it dried. The angled cut provides more surface area for water uptake. After cutting, I put the pitcher in a narrow vase with one inch of water and change it daily. If you want to dry the pitcher for crafts, hang it upside down in a dark, dry room for ten days. But for fresh display, water is essential.
Common Misconceptions About Harvesting Timing
Some bloggers say you must wait until the pitcher is completely dead. That is nonsense. A fully dead pitcher has lost its structural integrity and will crumble. The harvesting window is the peak of maturity, right before senescence begins. Others claim you should only harvest in spring. I have successfully harvested in late summer and early autumn. The key is the five signs, not the calendar month. The plant knows when it is ready. Also, never harvest more than one-third of the total pitchers at once. I did that once to create a large display, and the plant went into shock for a month. Conservative harvesting keeps the mother plant healthy.
What the RHS Recommends for Plant Maturity
According to the RHS, Sarracenia thrive in consistent moisture and full sun, and they recommend monitoring leaf firmness as a health indicator rather than relying on size alone. Their guidance supports the idea that visual and tactile cues are more reliable than age alone. Similarly, the AHS emphasizes that cold dormancy is essential for pitcher development, meaning the blackened base pitchers are actually a sign of a healthy seasonal cycle. I read AHS bulletins on dormant care, and that is when I understood that the brown tips were not a flaw, but a feature. Align your harvest with this natural rhythm, and you get superior specimens.
Three Fatal Mistakes I See New Growers Make Every Week
First fatal mistake: overwatering. I covered this, but I will repeat it because it is so common. 90% of indoor plants die from overwatering, and Sarracenia are no exception. People interpret the wet bog soil as a license to flood the pot. Stop that. Use the tray method and keep the tray dry for three days each week to let the roots breathe. I noticed stronger pitcher walls after implementing this cycle.
Second fatal mistake: placing them in artificial light. I tried growing one under a standard LED bulb, and the pitchers were pale, weak, and never formed nectar. Sarracenia need intense UV radiation to develop the mature pigments and waxy coating. A grow light that is not full-spectrum will do nothing. Invest in a strong grow light or move the plant outside. I have seen the difference in two weeks. The new pitchers looked like they belonged to a different species.
Third fatal mistake: using the wrong soil. Regular potting mix contains fertilizers that burn the roots. Sarracenia are carnivorous because they absorb nutrients through their leaves, not roots. Fertile soil poisons them. I lost my first plant to a bag of miracle-gro soil. The leaves curled and turned brown in five days. Use only inert media like sphagnum peat and perlite. The plant's focus should be on building trap tissue, not fighting mineral toxicity. The right soil made my pitchers noticeably more rigid within the first week.
How to Accelerate Maturity Without Hurting the Plant
There is no shortcut for time. However, I found that maintaining a warm root zone accelerates maturity. I placed a heat mat under my pots in early autumn, keeping the soil at twenty-two degrees Celsius. The result was faster nectar production and deeper color. But I stopped using it during the winter because the plant needs cool dormancy. Also, feeding the plant small insects, like dried mealworms, directly into the pitchers speeds up the maturation of that individual trap. I inserted one mealworm into a mid-sized pitcher, and within a week, it developed a darker gradient and firmer walls.
My Favorite Way to Display Harvested Pitchers
I arrange them upright in a vase with a few stones at the base for support. I never cut them too short because the long stem adds elegance. I also place a small amount of water inside the pitcher itself. That keeps the trap looking alive for several days. For a longer-lasting display, I seal the cut end with melted candle wax. This prevents the vascular tubes from collapsing. One pitcher treated this way lasted for three weeks on my desk. That was an experiment that worked surprisingly well.
When to Skip Harvesting Altogether
Sometimes you should not harvest. If your plant is a rare hybrid you are trying to propagate, keep the pitchers on until they naturally decompose. The energy in the old pitchers transfers to the rhizome. I harvested all the good-looking pitchers from my prized leucophylla once, and the plant produced weaker next-season growth. Now, I only harvest from established clumps with at least five mature pitchers. If the plant is young, let it be. Patience during the first year translates to a better harvest in the second.
Frequently Asked Questions
Q: Can I harvest a Sarracenia that has a fully developed lid but still shows soft spots on the tube? No. A soft spot indicates uneven maturity. The lid matures first, but the waxy zone needs more time. Wait until the entire tube is firm from top to bottom. I tested this once, and the texture difference ruined the final cut.
Q: What is the best time of day to cut a mature pitcher? Early morning. The plant is fully hydrated from overnight dew accumulation, and the cells are turgid. Cutting at noon, after the plant has lost some water to transpiration, makes the pitcher more prone to wilting. I always harvest right after sunrise.
Q: How long can a harvested pitcher stay alive in a vase? With daily water changes and a cool room, expect seven to fourteen days. If you use the wax seal trick, up to twenty-one days. But the nectar and color will fade after the first week. That is natural. The plant is no longer alive, just preserved.
A Final Word From My Experience
Identifying the right moment comes down to looking, not waiting. I spent weeks second-guessing myself. But once I systematized these five signs, harvesting became straightforward. Trust the plant's signals. The lid, the waxy zone, the nectar, the color, and the natural dieback. They never lie. Keep your water in check, give it brutal sun, use a deep pot. That is the formula. I have grown dozens of Sarracenia since then, and I have not ruined a single harvest. You will not either if you follow this checklist.





